I use a Viking-Husqvarna 350 machine, and stitch about 95% of everything using their basic zig-zag stitch, #3.
For thread I swear by Gutermann. I've tried other, less expensive, brands, and this is the best to me by far.
I do all my cutting with a rotary cutter and a cutting mat, except for long pieces that are too big for a mat. I cut those with straight scissors. I never pin pattern pieces down, but instead use pattern weights. If you don't have pattern weights, small tin cans (like tunafish or cat food size) will work perfectly).
I rarely cut out a pattern piece directly, instead I transfer the pattern to white tissue paper, the kind you wrap presents with. You'll see why when I start talking about pattern alterations.
I can't recommend Kerstin Martensson's "Swim and Action Wear" from Kwick-Sew enough. If you don't have a lot of sewing experience, especially on stretch fabrics, I highly suggest that you get this book and make a leotard or two to get comfortable. I use her techniques for altering patterns, for sewing and finishing seams, and for installing elastic. This book is worth every penny and then some.
When you measure, take each measurement three times and average them to ensure some semblance of accuracy.
It is very important that you make the test leotard out of the same fabric as what you will use for the actual dress. If not the exact same fabric, then use something that has the same stretch characteristics. The point of the test leotard is to see if you are using the correct size for the fabric you have chosen. Some fabrics are stretchier up and down than across, and some are more stretchy up and down than others.
I will be using slinky for the final dress, which has a lot of crosswise stretch but not a lot of up-and-down stretch. It is very likely that I will have to make adjustments to take this lack of up-and-down stretch into account.
When I make the leotard I just sew all the seams with a medium-wide zig-zag basting stitch (length 3.0, width 3.0). I sew everything with 10mm seams (that's the way my throatplate is marked). I do not bother putting in the leg, neckline, or armhole elastic. There's no sense in finishing off the garment like that because this is just a test.
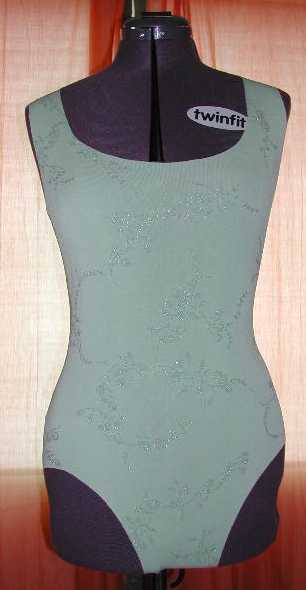
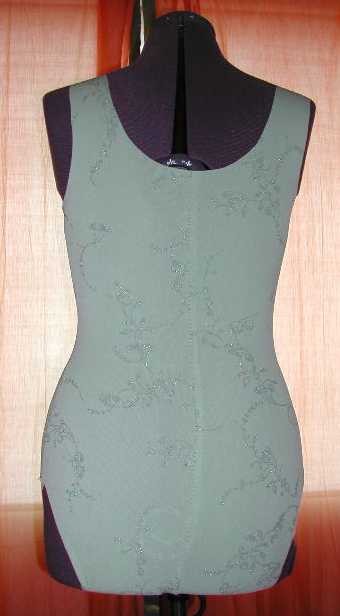
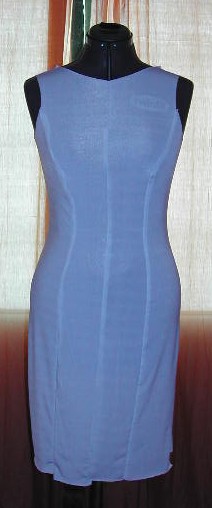
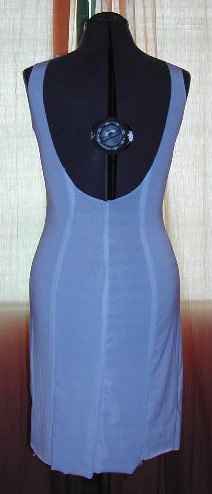
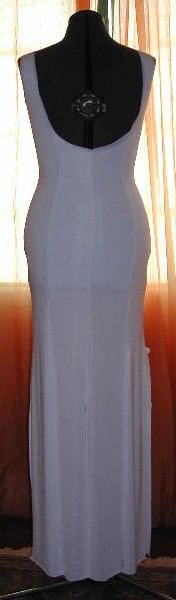
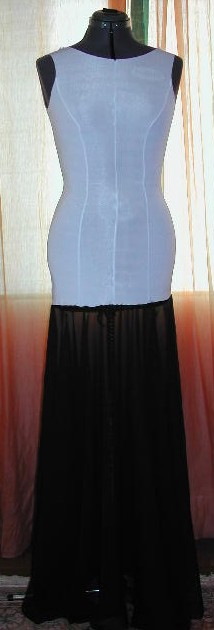
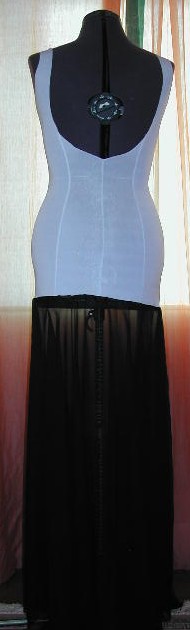
Here is the completed test leotard...
FRONT
BACK
The scientific way of doing this is to open up a pattern and read the "finished measurements" for the waist, hips and bust. This is usually printed directly on the pattern, not in the instructions, which means you'll have to practically take the pattern apart to find it. This is not looked upon well in fabric stores :-) If you do open up the pattern to look, you will want to cut the size which has finished measurements the same size or just a little smaller than your real measurements.
To avoid nasty looks in fabric stores, I use a sort of rule of thumb to chose the pattern size. First, I compare the measurements to the sizes in the BACK of the pattern catalog. Each pattern catalog has a measurement chart to help you decide which size pattern to choose. Do not be alarmed if your measurements translate into something much larger than your usual dress size...dress sizes for ready-to-wear clothes have enlarged over the years due to a marketing concept called "vanity sizing" which I won't go in to now. Suffice to say that, once upon a time, the sizes in the pattern catalogs used to match up to ready-to-wear sizes. Anyway, say your pattern size reads out as a (GASP) 14. Subtract 4 sizes from that (8 numbers....14 - 8 = 6). You will PROBABLY need to use the pattern in a size 6 to get the right fit when converting from woven to stretch fabrics.
For the example dress shown here, I looked in the back of the McCalls pattern guide and found out that the person I was making it for would take a 12 (as a comparison, she wears size 5 pants in ready-to-wear). I subtracted 4 sizes (8 numbers) and decided I'd better pick up a size 4 pattern for her.
Finding patterns that small is difficult. Most pattern makers use 6 or 8 as their smallest size..which is fine if you are working with woven fabrics, but doesn't quite suit our purposes here. Fortunately I found a princess-seamed dress pattern I could use.
While you're at the fabric store buying the pattern, you should also picked up thread (get one spool more than you think you need, 'cause you'll need it anyway), several yards of 3/8" wide "swimsuit" elastic, half a yard of 1/4" elastic, and pin-in bra cups (also called "molded") in the appropriate cup size.
Note that I didn't mention anything about a zipper. I hate zippers and will not be using one in this project.
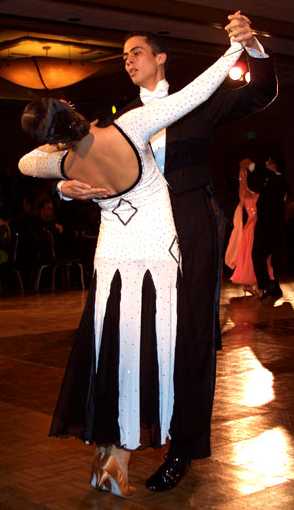
Oh, and if you don't have fabric, get some :-) I already had it so that's why I haven't mentioned it until now. I'm a big fan of slinky, but some people don't like it and have a difficult time sewing with it. I've never had any problems. I like it because it stretches crosswise but not really lengthwise, so it's great for using my usual "convert woven to stretch" method of making ballgowns. Some slinky is softer and stretchier than others. The somewhat heavier and stiffer version works best for making dresses.
If you get something with 4-way stretch, make sure it is relatively stable, like stretch velvet or swimsuit lycra. You don't want the dress to stretch too much in the vertical because of its own weight! Buy one more yard of fabric than you think you will need in case you make a mistake.
Which brings up a question: how much will you need? The information on the pattern won't be much help because you are going to flare out the skirts to make them full enough for ballroom, thus changing their layout calculations. As a rule of thumb, I say you need 10 yards to make a dress -- although if the fabric is 60" wide I've been known to get a dress done with less than 7 yards.
A dressmaker's curve is indispensable! If you don't know what one is, this is what mine looks like:
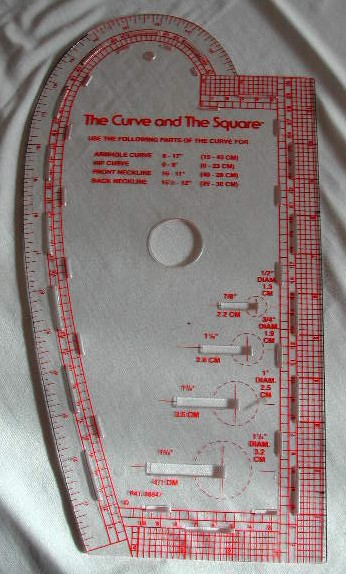
Get one if you don't have one!
Start out by separating the patten pieces you will be using from the rest of the pattern. If you are doing a princess-seamed dress, you should have four pieces: front, side front, back and side back. Some of the pieces will be marked with a waistline, some won't. If you're lucky, they ALL will be, but if not it helps to guesstimate where the waistline is on all pieces.
Let's say that your side back piece is not marked with a waistline, but the back piece is. Lay the pattern piece down, and lay the back piece next to it, oriented so that the tops are facing in the same direction and so that the notches (the pointy bits that stick out past the cutting line) are near each other. Now, measure up from the center of the notch for the size you are cutting to the waistline on the center back piece. The waistline on the side back piece will fall just about the same number of inches up from the matching notch on the side back piece. I hope the following picture will help:
Now that you've marked the waistlines, it also helps to mark the hiplines. Start with your back piece. To find the hipline, lay the back pattern piece from your leotard on the table. Now lay the back pattern piece from your dress over it, matching up the waistlines. Now trace over the hipline on the leotard pattern so as to transfer it to the dress pattern piece, as such:
![]()
Having these markings will help when it comes time to "flare" out the pattern piece to create the fullness in the skirt if you are making a dress from long panels with no godets. (Godets are the triangles of fabric that you sometimes see inserted into ballgown skirts.)
I guess I should back up here...I started writing these thinking I would discuss making a dress without godets, but it just so happens that the dress I'm working for this example on requires godets. Sorry if this gets confusing...but anyway, if you are making a dress with godets then you probably should have started from a straight "sheath" style princess-seamed dress in order to get the right shape for the dress before the godets are inserted. If you are not making godets then you can start from any princess-seamed pattern and then flare out the panels for the required fullness.
I will briefly discuss flaring out the panels, but have no pictures of this step.
Ok, now you've flared out the dress. For those of you not doing this, please rejoin me as I continue on :-)
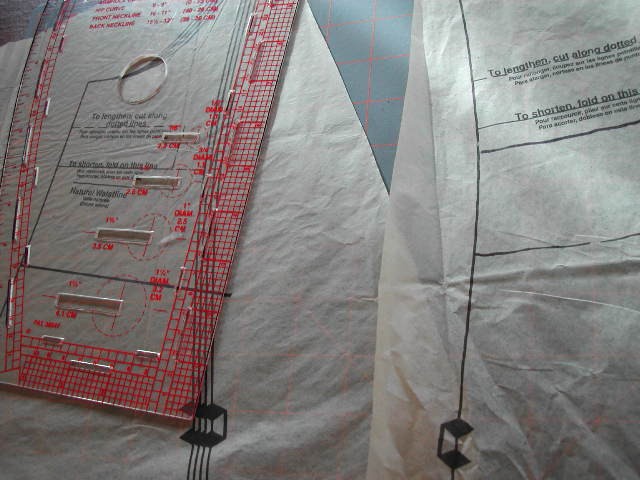
If you haven't already done so, adjust your pattern for length as described in step #1, above.
The next step -- and this is optional but I do this to preserve the original pattern -- is to tape some sheets of tissue paper together and trace a new copy of your altered pattern, in the size you will be using. You will use this copy to cut out the fabric. Don't forget to mark any notches, darts, dots, or other important pattern markings when making the tracing.
You should now be ready to cut out the underdress (if you're doing godets) or the main dress.
It is very important when cutting out to make sure that you lay out the pattern pieces so that the stretchiest direction of the fabric goes ACROSS the body. Also, if you are cutting on velvet, make sure the nap lays flat from top to bottom on all pieces. What is nap? Pet the velvet...you'll see it stands up if you pet it one way and lays down if you pet it the other. You want the nap to lay down flat if you pet from what would be the top of the pattern piece to the bottom.
Cut everything out, making sure to follow the notches for your size. After you've cut, keep each piece with its pattern piece so that you can properly identify the pieces when you start to sew.
The underdress for the gown with godets should hang down to about mid-thigh, where a chiffon underskirt that matches the godets will be attached. When I cut out the underdress I only cut the pattern pieces long enough to reach above the knees. When she trys on the dress I will mark the final length of the underdress.
And here it is:
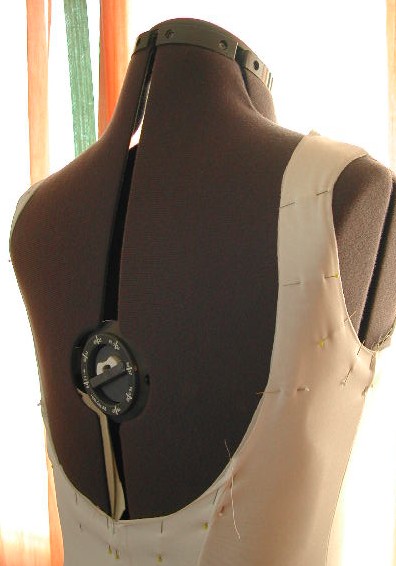
When I put the dress on the fitting dummy I saw that there's a very good chance that the dress is too big. Well, that's what fittings are for :-) If the dress is too big you can take it in by resewing the existing seams to the inside of their present location, and then trimming off the excess fabric. If the dress is too small you can let out existing seams. If the dress is WAY too small you might have to start over :-(
After finishing the Underdress I had the person I was making it for try it on and saw how much I needed to take the garment in. I calculated that if I used 5/8" seams that would make the garment snug enough, so I resewed all the seams at 5/8" and then trimmed the extra fabric out of the seams (actually, I am using a serger at this point, so that all happened automatically).
When I made the overdress I sewed it with 5/8" seams from the start. Note that if you made any alterations to the Underdress, the same alterations need to be applied to the Overdress -- you want the two layers to be as close to the same as possible, except one is longer than the other.
The logical next step would be to build the chiffon underskirt and attach it to the Underdress, and also start making and inserting the chiffon gores into the Overdress. However, I'm going to skip ahead to the construction of the actual leotard that goes inside the garment.
Note that I have not sewn any of the layers together or done anything about sleeves yet. I'm not going to put the layers together until after I've added the chiffon skirts, and I'm putting the sleeves in last so that they will be attached to all the various layers.
Basically, we need to merge the two patterns. I'll use the front of the leotard/dress as an example. In the picture below you'll see I have the front pattern piece of the leotard on the left, and the center front pattern piece from the dress on the right.
Why did I choose the center front dress pattern piece? What about the side front piece? The idea is to graft the part of the dress that maps out the neckline and the part that goes over the shoulder onto the leotard. In the particular pattern I'm using, the neckline and shoulder is part of the center front. So, I flip the dress pattern piece over and lay it on the leotard pattern piece, matching up the waistlines and hiplines previously marked on the pieces, and also matching the center fronts of both pieces at the waistline:
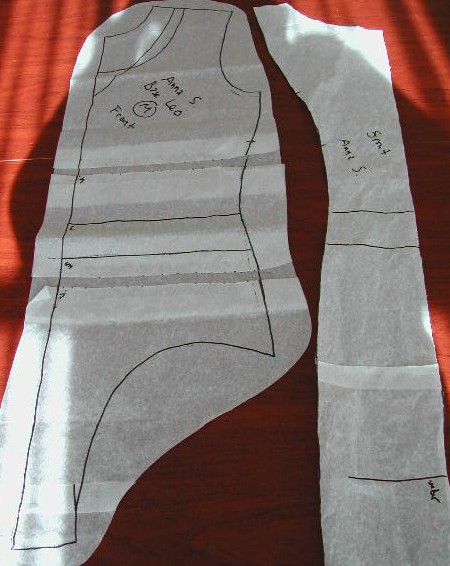
I now lay some more tracing paper over the whole conglomeration, and start tracing out what will become the final leotard pattern piece for this particular dress. Above the waist I follow the dress patthern, and below the waist I follow the leotard pattern. You'll notice that the side seams have not been addressed -- I usually just use the leotard pattern for the side seams. This isn't exact but it's always been close enough for me. In the picture below I've traced out the final pattnern in black. I've also sketched in the lines I didn't trace in blue, just to make it easier for you to see what I've done.

Repeat for the back pattern piece. Be careful, though...you might want to match the side back dress piece to the back pattern piece at the side seams, rather than matching the center back pieces at the back center seams. It all depends on what panel the shoulder straps are connected to. You can be even more exact by doing both :-)
When you're done, cut out and sew the leotard but don't attach it to any other layers, or finish off the armholes, neckline, backline, or leg openings.
Remember pi? That Greek letter that looks like a miniature sketch of Stonehenge? In math it refers to the ratio of a the circumference (outside edge) of a circle to its diameter (a line drawn through the middle of the circle). pi is not an exact number, it is 22/7, which my calculator works out to 3.142857 on my calculator. Remember this number :-) Ok, imagine a bagel, sliced, sitting there waiting for you to put something on it. You've got a small circle (the hole) inside of a bigger circle (the outside edge of the bagel). This is what a circle skirt is like. The hole is where your body goes, and the outside edge is the hem.
So, to make a circle skirt for the underdress, I start by measuring around the bottom edge of the underdress to determine the size of the hole where the body goes. Say we get 36 inches. This means we want the distance around the inner circle to be 36 inches.
In order to create such a circle, we must determine the radius (which is half of the diameter) that this 36 inch circle would have. This is where the geometry comes into play. There's a mathematical formula that allows you to find the diameter if you know the circumference and vice versa:
circumference = pi * diameter
So let's do a little math:
36 = 3.142857 * diameter
36/3.142857 = diameter
diameter = 11.45
Let's say that the diameter of 36" circle is 11 1/2 inches. That means the radius, which is half of the diameter, is 5 3/4 inches.
We also need to figure out how long to make the underskirt. Do this by measuring from the bottom of the underdress to about 2 inches from the floor. This measurement will be used to help you draw the outer circle.
Ok, now say you need the skirt to be 32 inches long. If you add that to the radius we found above, you'll see that the radius of the outer circle is 37 3/4 inches. Remember this one too :-)
Circle skirts are most often cut as half circles, selvage to selvage, in the fabric. So, lay out the fabric somewhere that you have about 80" (double the radius of the outer circle) of space. You might have to push some furniture around if you don't have a large table :-)
About midway along one long edge of the fabric, stick a pin into the carpet, table pad, or whatever is underneath the fabric. I've never done this on a hardwood floor, so if that's your cutting situation you'll have to improvise.
Now, take your tape measure and loop the little metal hole in the end over the pin. If your tape measure doesn't have a hole, then stick the pin through the tape measure itself up very near the end. The tape measure now gives you a way to measure the circle's radius.
The inner circle needs to be 5 3/4" in radius, to produce a diameter of about 36 inches. So, line up the tape measure with the edge of the fabric, measure down 5 3/4", and make a little mark. Then move the tape measure slightly (so it pivots on the pin), and make another mark. Continue doing this, as shown below, until you've marked off the edge of the inner (half) circle.
Next, before you move or cut everything, mark off the outer circle: repeat the previous step, but measure out to the radius of the outer circle, which was 37 3/4" in our example.
Cut out the inner and outer circles along the lines you drew, and then repeat the entire process for the other half circle. I do not recommend stacking the chiffon and doing both circles at once because the layers slide around too much and one of the circles will distort.
After you've cut out the half-circles, sew them together at the straight edges.
Lastly, attach the skirt to the underdress.
I start out by figuring how high up the dress I want the points of the godets, and I snip the overdress seams accordingly.
Then, I measure down from the top of the snip to the hem. This is the radius of the circle I will cut to create the godet itself.
But how do I know how wide to make the godet at the bottom? That's up to you. One thing for sure: you want the overdress to be more full (have a bigger circumference) than the underskirt. My underskirt came to be about 20 feet in diameter. I am going to put 8 godets into the dress, so I decide I'll cut them to each be 3 feet wide at the bottom.
To achieve this, I'll draw out a half circle 34" in radius (this was my distance I measured from the top of the snip to the hem). Then I'll use my tape measure to measure 36" along the outer edge, and make a mark. I'll keep doing this until I run out of circle :-)
I then draw a straight line from my mark to the pivot point (center) of the circle, where the pin is that is holding the tape measure down. this is the side edge of the godet. Depending on the size of the godet, you'll probably have bits of half godets left over in each half circle.
However, if you do 1/8 circle or 1/4 circle godets, you don't have to do this last measuring step, you can just divide up the half circle and go on your merry way.
There are two ways to sew the godets in: the right way, and the way I do it. I don't even know the right way, so I'll just describe my method.
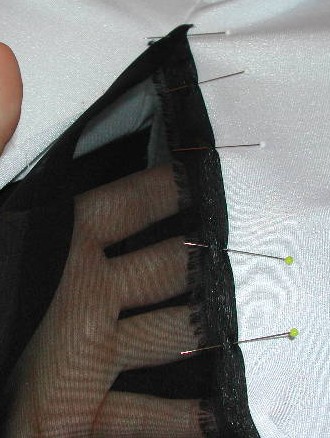
Start by pressing a little hem (1/2" will do) along each side edge of the godet. I use a little metal pressing tool to make this easier:
Next, pin the godet to the front (the right side) of the dress. We are not going to make a real seam, but rather are going to topstitch the godet to the dress. Make sure that the point of the godet fully overlaps the top of the seam:
Start at the top of the godet, at the point, and topstitch one edge down:
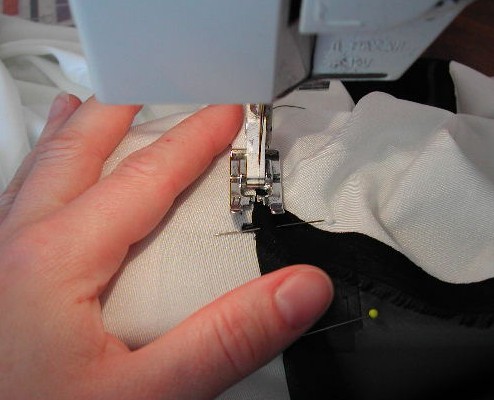
Then repeat for the other side.
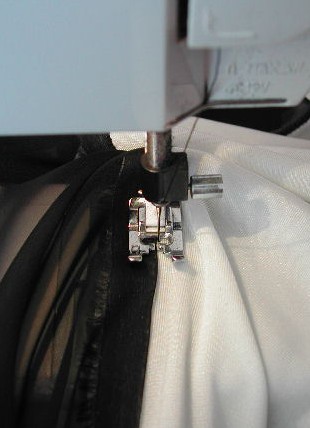
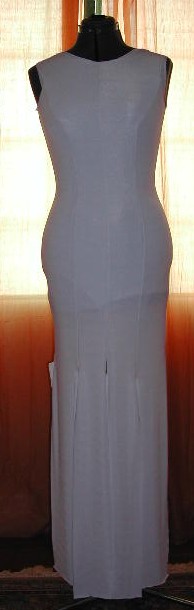
And here is the completed overdress:
Try the dress on (the real person, not the dummy) and mark the correct length for the hem for both layers. Cut and finish the hem. I have a serger so can do rolled hems automatically on it. I don't know how else to do them, sorry!
This would be a good time to finish off the leg openings of the leotard with elastic, as described in the Kwik-Sew book.
Next, put the dress back on the dummy, and line up the seams and edges in the various layers. Pin the layers together:
Take the dress off the dummy, and baste the edges (neckline, armholes) together.
If you are making a sleeveless dress, you can finish off the neckline and armholes with elastic, as described in the Kwik-Sew book. Otherwise, the next step is to make the sleeves.
Let's start by taking a look at your sleeve pattern. You'll see a bell-shaped curve at the top, where the shoulder goes. This is the sleeve cap. Poofiness is caused by excess fabric in the sleeve cap.
Measure the armhole opening on the dress and compare that to the distance across the sleeve cap on the pattern. Make sure you follow the shape of the bell when you measure:
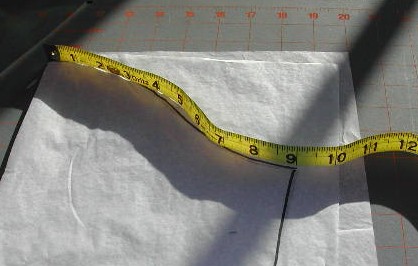
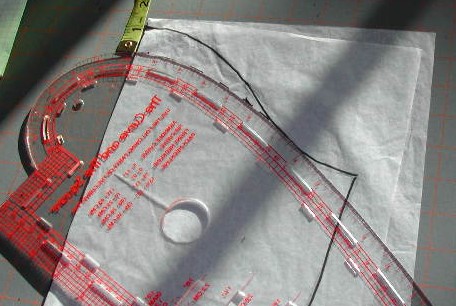
Chances are very good that you will have to reshape the sleeve cap to remove some excess fabric. This is called "flattening" the sleeve cap. Measure about an inch down from the center top of the sleeve pattern. Then, use the dressmaker's curve to fit in a new, flatter curve:
Now measure the new cap to see if you've taken enough out:
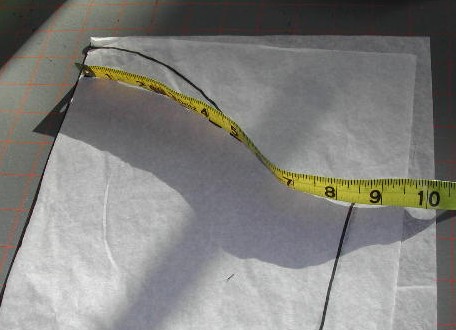
I do this all by guesstimation, so you might have to redraw the sleeve cap a couple of times to get it right.
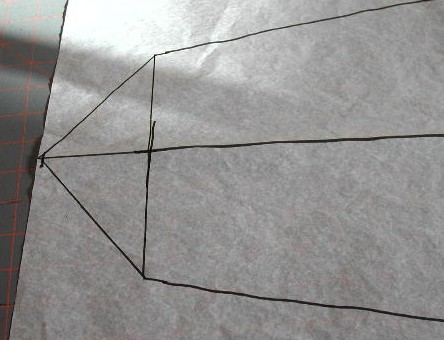
Next, draw the points at the hand-end of the sleeves. Start at the center of the original sleeve hem. Measure out the number of inches from the wrist bone to the knuckle of the middle finger. Now, connect the sleeve edges to that central point:
Cut out the sleeves, and sew them and attach them to the dress.
Finish off the neckline with elastic as described in the Kwick-Sew book. For this dress I'm adding contrasting binding. Instructions for doing this are included in the Kwick-Sew book (I told you it's worth every penny).
Hem the sleeves. Hand-sew small loops of elastic to the point to loop around the wearer's middle finger.
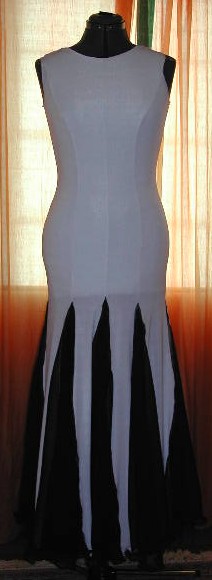
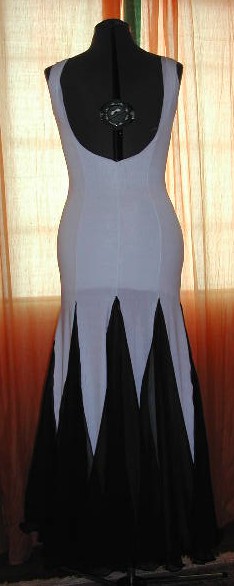
At this point, dress construction should be complete. Now it's time to decorate the dress. The traditional method is to glue on lots and lots of rhinestones :-)